
If your craft supplies could you an overhaul, then this ultimate guide is for you!
Craft supplies include can be hard to organize, especially when you’re constantly in and out of the boxes searching for specific supplies. But it is possible to get organized — and stay that way — with these strategies:
Before you begin the process of organizing your children’s craft supplies, it’s a good idea – like with every area we organize – to begin by asking yourself some questions about the age and maturity of your children, the role you want crafts to play in your family and the space you have available for them.
Considering Your Children
- How old are your children?
- Can you put the craft supplies at their level, or is that a disaster waiting to happen?
- Do you want them to be able to get the craft supplies on their own or only when you help them?
There are no right answers to these questions across the board, but there may be right answers for your family. We went through the whole “cutting hair” stage with our oldest, and you couldn’t have paid me to leave scissors anywhere she might have been able to access them during that time. Now I find that keeping some of their basic supplies where they can get to them on their own encourages more arts and crafts, which is important to me. My kids are still pretty young, so I don’t give them free access to everything, just things that I think they’re old enough to handle.
Crafts in Your Family
- What role do crafts play in your family?
- Do you place a lot of value on arts and creativity and want your children to spend time everyday coloring, drawing, and creating?
- Are crafts something you only do every once in a while?
- How many craft supplies do you have?
- Are you happy with the amount of time you spend on arts and crafts, or is their storage and location a hindrance to doing it more often?
Obviously, your craft “philosophy” should have an impact on how you store arts and crafts. If crafts aren’t a high priority or something you want to do often with your children, then a basket, bucket, or bin shoved up on a shelf somewhere may be enough. If crafts are something you want to encourage regularly, then you’ll need to make them easier to get to so that the struggle of getting everything out doesn’t prevent you from doing more crafts.
Space in Your Home
- Where do you do crafts the most often? In your kitchen? In a playroom? Outside?
- Is there a storage space – for example, an armoire, a closet, a shelf, a drawer, or a cabinet – near your craft area that you could use for storing crafts?
As I said before, having the space to store your crafts conveniently will often make a big difference in your willingness to drag everything out for your children. Making more room for crafts – if they’re important to you – is a good way to encourage their use. If this is a problem, start brainstorming now about what areas you could shift around to make more space for arts and crafts supplies, keeping in mind whether you want those to be within your children’s reach.
Table of Contents
Getting Organized
Okay, now that you’ve asked yourself some questions about what role crafts play in your family and where you’d like to keep them, let’s look at a plan to actually get organized.
1. Lay out all of your children’s craft supplies. I know this is always the hardest step of getting organized, but I really believe it’s the secret to getting organized By laying things out, you’ll be able to see everything at once and organize it as you pack it away, so that you can group things together rather than having them scattered throughout the craft area. Of course, if you have little kids, laying out all of your craft supplies such as little sticker crafts, at once with them around is a recipe for disaster when they’re around, and you’ll also need to be committed to packing it all away or dealing with the additional clutter until you get it done.
2. Throw away any craft supplies that have outlived their usefulness. This includes old glue that’s hardened, broken crayons (unless you’re really going to make these adorable melted crayons), roll stickers or sheet stickers that are mangled and almost empty, and coloring books with hardly a blank page left in them. Sorting through and decluttering your craft supplies gives you a fresh start as you begin to organize. You’ll need less space, and everything will be neater and easier to straighten.
One caution: Be prepared for much wailing and gnashing of teeth if your children see their craft supplies in the trash. In my experience, it doesn’t matter how trashed the supplies are or how many beautiful supplies they still have – or that they won’t even notice if they don’t see it in the trash can – they’ll decide THAT was their favorite craft supply that they couldn’t possibly live without!
3. Group the crafts in a way that makes sense logically and also makes them easiest to get to. If you’re using baby wipe containers, you may put markers in one, paints in another, and crayons in a third. If you’re using a larger shoebox or plastic storage bin, you may find that combining similar supplies to fill each box is a better way to do it.
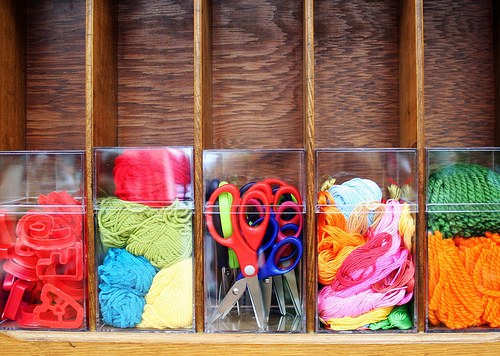
4. Use smaller containers to hold small craft supplies together. Keeping small supplies contained is an important part of cutting down on the mess and chaos of disorganized craft supplies. Although there is no doubt that sorting and packing these things can be the most time-consuming part of the process, having buttons or pompoms or foam pieces contained rather than just thrown in a box will definitely make it feel more organized and make the supplies easier to get to and use.
Discover the ultimate guide to organizing children’s craft supplies, a must for incorporating custom-made key holders. This comprehensive article offers strategic solutions to keep your crafting area tidy and accessible, ensuring creativity flows without clutter.
5. Pack and label your boxes! It’s okay if you don’t have a label maker, just grab some tape, write a label and stick it to the box. Once your boxes are labeled, anyone who needs access to them will be able to easily find the craft supplies.
Craft Boxes
One of the ways that we keep our craft supplies organized is by creating smaller craft boxes or bins for everyday use rather than letting the girls dig through the big boxes of supplies. I love this method for many reasons:
- I can get basic supplies ready ahead of time so that the girls can grab them quickly and easily when they want to do crafts.
- Although my craft storage is organized by type, these boxes or bins contain a variety of supplies so the girls can choose whichever appeals to them on a given day.
- We’ve cut down on the girls rummaging through bins and cabinets to get more supplies.
- They’re easy to clean up, and the girls can do it themselves.
- I can give the girls a smaller quantity of certain supplies rather than have them use all 120 pipe cleaners at one time!
So how do you decide what to keep in your art boxes? You can probably guess what my answer is to that question…it depends on your kids, your family, your home, and your rules!
But here’s a basic list of what we include for younger kids:
- Scissors
- Crayons
- Paint dots
- A small velvet art picture and markers
- Construction paper
- Glue sticks
- Pipe cleaners
- Stickers
You could, of course, add whatever you want to the boxes, based on your kids’ interests, how much you want to supervise, what you have on hand, etc.
How I Do It
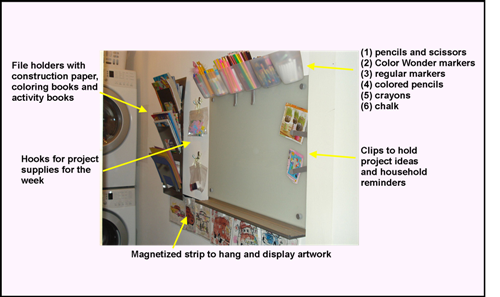
I first took this picture of our “craft wall” a couple of years ago, but it looks almost the exact same today, except the wall is now green and there’s a wooden shelving unit built around the washer & dryer and opposite wall.
All of our stuff came from Ikea (of course!). We use the glass board for our shopping list throughout the week, notes, doodles, etc. From the bar above the board, we hang 6 plastic cups with a variety of markers, colored pencils, crayons, etc. We use the metal file holder on the far side to hold coloring books, notebooks, etc.
In addition, I have five plastic boxes upstairs in our toy/homeschool/craft cabinet that include our stash of project supplies. Those are divided by category and include:
- Paints and Glue
- Paper and Stickers
- Embellishments (foam shapes, pipe cleaners, googly eyes, popsicle sticks, etc.)
- Play-Doh and Moon Sand
- Bubbles and Chalk
How Much is Too Much?
One of the things we struggle with is how quickly we go from a good variety of craft supplies to way too much! For a while, I was offering grandparents the idea of craft supplies for birthdays and Christmas, since they’re consumable and our girls spend so much time crafting. But really, even that got out of hand, and we soon had way too much.
To reduce the number of craft supplies we have, we try to resist the urge to “get it in every color”, sticking with just what we need instead. We also share with others, plan multiple projects around the supplies we have or buy, and — when all else fails — give the extras away to another family to use!
A friend of mine is considering an Art in the Park day, where we can all bring our extras to share and just spend a day creating. I love that idea as a playdate for using up things that might otherwise just sit and go to waste.
Another idea is to use repurposed materials — egg cartons, toilet paper rolls, shipping paper, etc. — or homemade paint, glue, etc. rather than purchasing new supplies all of the time. Repurposing is a great way to stretch your creativity, save money and avoid waste.
And Then What?
One of the biggest challenges of arts & crafts — especially with our second daughter, who would create all day every day if we let her — is figuring out what to do with all of the artwork once it’s done. I hate to throw anything away, but we would be storing boxes and boxes of stuff if we kept it all.
Here are a few of my ideas for reducing the clutter while still honoring your kids hard work and creativity:
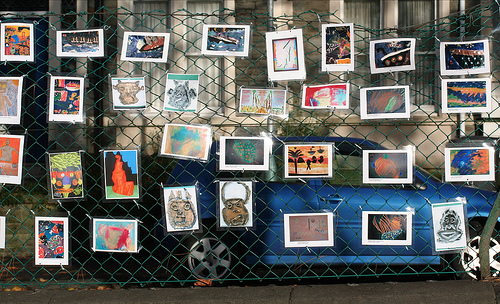
- Display artwork for a limited time when it’s “fresh”. Stick it to your fridge, use a special bulletin board to display the latest projects, look for artwork frames that allow you to easily change the pictures, or hang them with clothespins on a string hung across the wall.
- Give each child a special keepsake box for storing their most special artwork and crafts. Decide together what goes in the box, and remind them that they may have to make some hard choices if the box gets full.
- Take pictures or scan any pieces that you won’t be keeping so that you’ll always be able to go back and see them.
- Mail artwork to a relative or friend with a special note.
- Use their drawings and paintings as wrapping paper or cards throughout the year.
- Get a kit that is self-contained with all the supplies that you need.
I am sure I will look back on this stage and miss the time they spend at the kitchen bar coloring, drawing and making collages, so I look for ways to contain the chaos without squelching their creativity as much as possible!
Click here for paper plate craft ideas for kids.
How do you organize craft supplies in your home?