

These candy cane cookies are a staple of our Christmas celebration (although, if I’m honest, I end up eating most of them myself!).
Every time I share a picture of them on social media, though, people ask questions or share their stories of failed cookies. Since this is the one “impressive” thing I can do in the kitchen pretty much without fail, this year, I’m sharing my best tips and tricks for perfect candy cane cookies.
First, the recipe:
Ingredients:
- 2 1/2 cups King Arthur Unbleached All-Purpose Flour
- 1/4 teaspoon salt
- 1 cup unsalted butter, softened
- 1 cup confectioners sugar
- 1 egg
- 1 teaspoon vanilla extract
- 1 1/2 teaspoon almond extract
- red liquid food coloring

Directions:
Preheat oven to 375 degrees F.
Whisk flour and salt together.
In a separate bowl, cream butter and sugar. Beat in egg, vanilla extract, and almond extract. Slowly add the flour mixture, scraping the sides of the bowl as necessary.
Divide the dough in half and add the food coloring to half, mixing well.
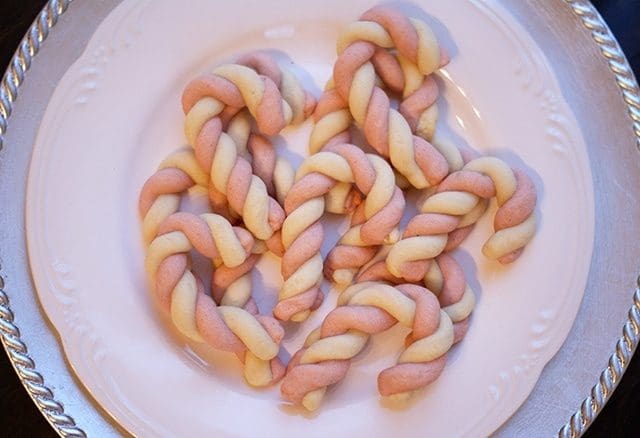
Pinch off a small ball of dough from each color and roll them each out into a 4-5″ long rope. Set the ropes side by side and carefully twist them together, bending one end to form the candy cane hook.
Place on a cookie sheet and bake for 8-10 minutes until they are just starting to brown. Let cool on the cookie sheet and then store in an airtight container.
Yield: 2 dozen cookies
Click here to add this recipe to your Plan to Eat account.
If I was a good blogger, I would have waited until morning and taken this picture in a better light, but I wanted to eat the candy cane cookies, so this will have to do!
Tips & Tricks
Butter: I rarely use softened butter for ANY recipe because I’m just not that prepared. Instead, I toss the cold sticks of butter right in the mixer bowl with the other ingredients, turn it on high, and let the mixer soften it for me.
Refrigerating: It’s very important that you refrigerate this dough before forming the candy canes. Starting with cold dough helps it keep its shape even as you’re rolling it out. If your kitchen is warm (ours is definitely not!), you may need to pull just a little from the fridge at a time. I tested two batches to see if putting the formed cookies back in the fridge before baking made a difference, and it really didn’t. However, if your kitchen is warm, you may want to make only a few at a time and refrigerate the cookies tray while preparing the rest.
Spreading: These cookies should not spread, as evidenced by how closely I packed them on my baking stone in the top picture. If yours are spreading, chances are the dough is not staying cold enough, which allows the butter to melt before they bake.
Adding liquid food coloring: My homemade food coloring is not as vibrant as red 40, which means I had to use more than a teaspoon. I added an extra tablespoon of flour to the red dough to compensate.
Crumbly dough: If your dough seems crumbly after adding the flour, just keep mixing until it all comes together in a smooth dough.
Sticky dough: I’ve never had this happen when following this recipe exactly, but if you end up with sticky dough, try adding a little more flour, a tablespoon at a time, until it’s smooth. Keep in mind that it will get less sticky once refrigerated, but you still want it to be pliable rather than sticky before you wrap it up.
To form the cookies: Pinch off a teaspoon-sized ball of dough from each color. (Note: the exact amount of dough isn’t as important as using the same size for each piece!) Roll it under your hand on a piece of parchment paper or cutting board to form a long robe. Twist two robes together gently. I like to make smaller cookies because they’re less likely to break, but I have to fight the temptation to make longer ropes each and every time. I always twist the ropes together a couple of extra times to give them a nice shape. Your dough should be pliable enough to twist them together really well!
Baking: Bake for 8-10 minutes. I like to pull mine out when they look dry but have not yet started to brown.
Have you made these cookies? Do you have any other questions about how they’re made?
More Christmas Cookies:
Join us as we celebrate 101 Days of Christmas with new DIY projects, gift ideas, traditions and more every day from now through Christmas!