
Yarn dolls are a great gift to make with your kids for their friends or as a service project, or they can be used as a fun stocking stuffer.
These remind me of a simpler time when toys didn’t flash and beep to entertain, and I love them for their simplicity. They’re also very inexpensive (you could make dozens from a single skein of yarn), which doesn’t take away from the time, effort, and love that goes into making them but does make them a practical gift to give even on a tight budget!
Supplies:
- yarn, one or more colors
- scissors
- a book or piece of cardboard
Directions:
Carefully wrap a piece of yarn around a book or piece of cardboard. The size of your frame will determine how many times you need to wrap it, but for an 8-10″ book, you should wrap the yarn at least 50 times.
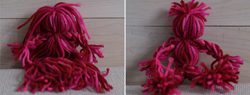
Once you’re done, cut the yarn from the skein and then cut another small 4-6″ piece of yarn, which you will slide under the strands on the front of the frame and then tie tightly around the loops at the top to hold all of the strands together.
Gently slide the loops off the frame and use another 4-6″ piece of yarn to tie the neck about an inch from the top of your doll. Tie securely.
Separate 5-10 loops on each side of the doll to form the arms. Cut off the ends of the loops, 3-4″ from the end. Save these to use as ties and hair.
Carefully braid each arm, tying tightly at the end and then trimming the “hands” so that they’re even.
For a boy doll, tie another string to form the waist. Then cut the loops at the bottom, split the yarn in half, and braid each half to form the legs.
For a girl doll, simply cut the loops at the bottom and trim.
Finally, for the hair, take the ends that you cut from the arms and lay them across the top of the head, from side to side. Remember the string you tied, in the beginning, to hold it all together? Use it to hold the hair in place, tying it tightly around the strands. Trim the hair (a little at a time!) until it looks the way you want it to.
Variations:
- Give your girl doll a skirt rather than a dress by tying a waist and leaving the rest loose.
- Use different colored yarn, the ones that are on sale for the arms or hair.
- After forming the head, divide the loops into 8 sections and braid each one to make an octopus.
- Braid the hair to form pigtails.
- Add bows to the hair, collar, or waist rather than just tying the strings with knots.
- Use bigger or smaller books to make different sized dolls.
What other variations have you seen?
Join us as we celebrate 101 Days of Christmas with new DIY projects, gift ideas, traditions, and more every day from now through Christmas!