
I was looking for ways to cover jar lids for a gift that I’ll share later this week when I stumbled across this super simple idea on Pinterest.
It may be my favorite project of this whole series because it’s so quick and easy with such a high impact.
I’ll be using it for Christmas gifts this year, and then when Christmas is over, I think I’ll re-cover the lids of the dozens of jars in my pantry as well!
Supplies:
- wrapping or scrapbook paper
- jar lid
- pen or pencil
- a larger circle to trace (I used a bowl that was about an inch wider than the lid)
- Mod Podge
- a foam brush
Directions:
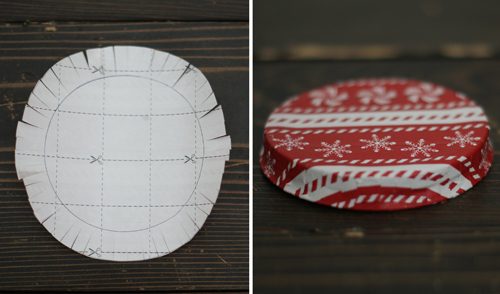
Trace your larger circle onto the wrong side of a piece of wrapping or scrapbook paper.
Note: You can do this with wrapping paper (like my lid above!), but remember that thinner papers will be a little more fragile once they’re wet with the Mod Podge.
Center the jar lid in the center of the first circle and trace it as well.
Cut out the larger circle and then begin cutting “fringe” all around the edge of the circle. Each cut should go just to the smaller circle’s edge (see the picture above).
Spread the inner circle with a thin layer of Mod Podge and glue to the jar lid, smoothing out any air bubbles as you go.
Add glue to a few pieces of fringe at a time, folding them around the edge of the jar lid as you go. They’ll overlap slightly.
You could stop here or put a protective seal on the paper on the lid, let it dry and then apply a coat of Mod Podge over the whole thing. Repeat 2-3 times.
Join us as we celebrate 101 Days of Christmas with new DIY projects, gift ideas, traditions, and more every day from now through Christmas!