The following post is from Amanda of Everyday Elements:
Digital cameras were an awesome invention, allowing many to pick up the hobby of photography and learn it much faster because you can instantly see the image, and not have to wait for film to be developed. Along with digital cameras, came the invention of similarly awesome photo processing software, such as Photoshop and Photoshop Elements, which allow you to manipulate and enhance your digital pictures.
Photo processing programs are wonderful and amazing, but too often people use them as a safety net. They don’t bother learning how to get it right in camera and instead depend on the editing software to correct problems that could (and should) have been avoided.
One of the most common mistakes made in-camera and most often corrected in post processing is exposure, so let’s talk about what it is and why it is important to get it right in-camera.
What is Exposure?
Exposure is the over all brightness or darkness of your image. It is determined by the ISO, aperture and shutter speed used when a picture is taken.
- If the image is too bright, it is overexposed.
- If it is too dark, it is underexposed.
- If it is in-between, it is properly exposed.
In other words, we’re looking for the Goldilocks “just right” amount of brightness.
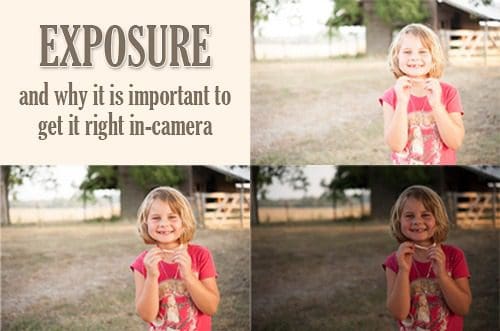
Below are three images which illustrate the three levels of exposure. They are of my niece in the fall. The images are basically SOOC = straight of of the camera, no post processing done except slight cropping and sharpening for web.
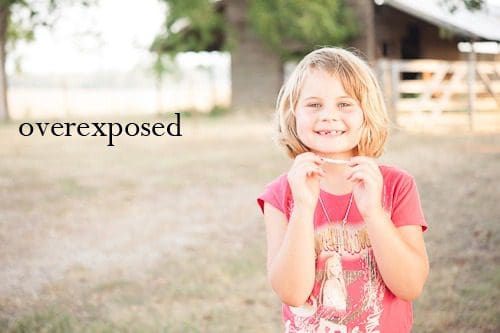
Overexposing
When the camera has allowed in too much light, causing the image to be overly bright, washing out the background and/or subject.
Yikes! She’s sure is bright, isn’t she? And actually and if we looked at it in a program like PSE or Lightroom, we would see that some of her skin has been “clipped” or “blown out” because the exposure is just too bright. That clipping is important, and I explain why below.
Overexposure is usually caused by the shutter speed being too slow or the aperture too wide; both things will allow more light to hit the sensor. To correct overexposure try these things:
- Decrease your ISO
- Narrow your aperture (make your F number bigger) to let in less light
- Speed up your shutter speed (via metering)
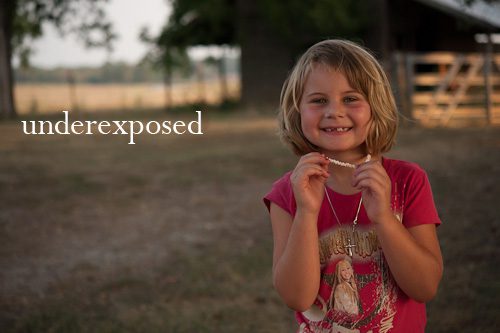
Underexposing
When the shutter has closed too quickly, not allowing in the proper amount of light to properly expose the subject.
Okay, someone turned off the lights, or it seems that way, doesn’t it? This is obviously under exposed. See how hard it is to see her eyes? Mentally I want to turn on a light switch so that I can see her better.
The overall darkness of the image causes other problems down the road, when post processing. So, try hard to avoid underexposing your images.
Under-exposure is typically caused by a shutter speed that is too fast, not allowing enough light to the camera sensor. To correct this try:
- Increasing your ISO
- Opening up your aperture (making the F number smaller) to allow in more light
- Slow down the shutter speed (via metering)
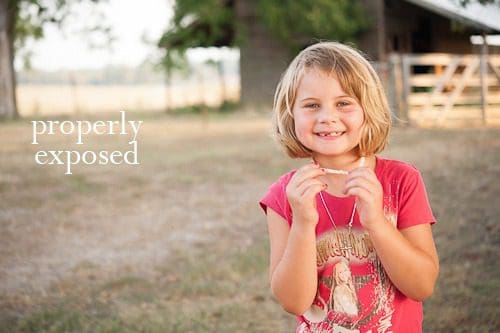
Good Exposure
When the shutter stays open just long enough to allow the right amount of light to illuminate the subject.
Now we’re getting somewhere. This next shot is much more pleasing to the eye. We can see her eyes and her skin is a nice color and brightness without being too bright. Straight out of the camera, this picture is lovely and could be printed or used online without processing.
A correct exposure means that it was a good balance of ISO, aperture and shutter speed, the three elements that go into the Exposure Triangle.
So now that you can visualize what a properly exposed picture should look like, you may be thinking to yourself “Okay, Amanda, I get that, but why is it so important to get it right in camera, why can’t I just fix it in PSE/Lightroom/Photoshop?”
Great question, glad you asked!
Reasons why properly exposing in-camera is so important.
- Time – the more pictures you have that need correcting, the longer you will be sitting at your desk working on them. It may be fun at first, but trust me, you will get tired of spending all your time editing.
- Noise – when you underexpose an image, you are introducing noise to the picture, even if you fix it later in post processing.
- Sharpness – underexposed pictures will be less sharp than properly exposed pictures, because you introduced noise by underexposing, which lessons the crispness of the image.
- Motion blur/sharpness – overexposing means more light is allowed to reach the sensor, meaning the shutter stayed open longer than it needed to. This slowdown in the shutter speed may cause it to be too slow for the moment, causing motion blur, either from you moving or your subject moving.
- Clipping – when you overexpose (and shoot JPG format) you may not be able to recover from that mistake, regardless of your post processing program. That means that area of the image that is clipped/blown-out will print flat, without texture (like skin texture).
All this ISO, aperture, shutter speed and metering talk may lead to even more questions, so my next post will be on the Exposure Triangle (I capitalize it because it’s that important) and metering. So, stay tuned!
Do you find getting the correct exposure to be a challenge?
| Amanda is a quirky, introverted mom of four who is passionate about helping others learn their cameras and editing software. She homeschools her four kids, ages 13 to 6, all of whom run away when they see her carrying her camera. | |