The following post is from Janel of Life with Lucie and Ella.: DIY Raffia Covered Vases
Since I left citrus-rich California for Virginia ten months ago, I’ve discovered something about myself. Citrus makes me happy! The scent, taste, and colors make me feel good. So, when I pulled my June issue of Better Homes and Gardens out of my mailbox, I had to smile.

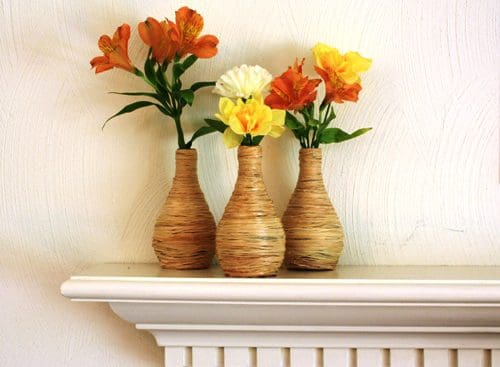
The cover shouted “citrus,” from the orange-hued headlines to the yellow flowers to the lemons on the table. My eye was immediately drawn to the interesting homemade vases in the corner. I knew I needed to try to make some vases of my own…I just love repurposing everyday items with a bit of creativity!
Instead of using beer or wine bottles as B H& G did, I chose something citrusy that makes me happy. Orangina!
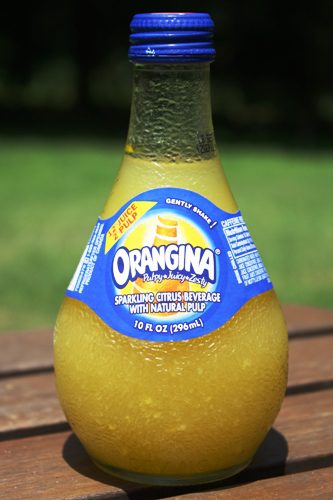
Even unadorned, an Orangina bottle makes a lovely vase because of its unique shape. However, when covered with raffia, this bottle can add some beautiful texture as a centerpiece or as a decorative element on your mantel or side table. It also makes a perfect hostess or teacher gift when filled with a few flower stems.
Of course, you don’t need to use an Orangina bottle. Think green and look for other glass bottles or jars that you can re-purpose to give them new life. Cylindrical salad dressing bottles or wide-mouth jam jars (like Bonne Maman) would work great too!
Make Your Own Raffia Covered Vase
To make your own Raffia Covered Vase, you’ll need:
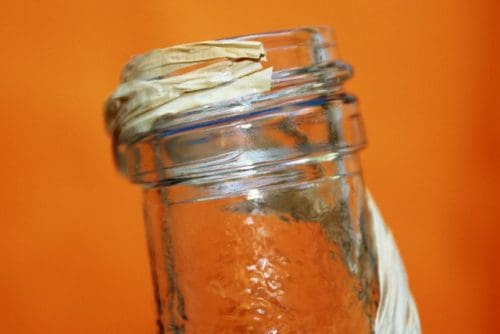
- A glass bottle or jar – cleaned, labels removed, and metal cap rim snipped off
- Raffia – natural or color of your choice
- Glue gun and glue sticks (I used a low-temp one)
- Spray sealer, like Krylon Finish in Satin or Matte (optional)
Here’s how you do it:
Starting at the top of the bottle, apply a little glue and attach the end of a length of raffia. Hold until secure.
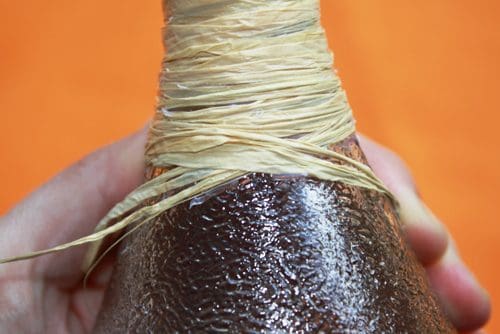
Wrap the raffia around the bottle and overlap the starting point of the raffia to hide the end. Secure with glue as necessary
Continue to wrap the raffia around the bottle and secure it with glue as needed. Be sure to affix the raffia close to the previous ring of raffia to hide as much of the bottle as possible. You may need to twist the raffia a bit to get it to follow the contours of the bottle. Wipe off any excess glue that seeps out from under the raffia for a clean look.
If you are not using a continuous piece of raffia, you’ll need to overlap ends when you transition to a new piece. I like to do this by ending a strip of raffia at an angle and then starting the new at the opposite angle, so they make an X. This helps camouflage the transition and keeps the end pieces tucked in and secure.
Continue wrapping and gluing until the bottle is covered. If you plan to fill your vase with paper or silk flowers, you can leave it as-is.
However, if you want to use it for real flowers, you’ll want to make it a little more durable so that it can hold up to a splash or two of water. To do this, use a sealer of your choice. I used a spray finish by Krylon. It dries very quickly, is water-resistant, and is non-yellowing.
How have you re-purposed everyday items and turned them into something that makes you smile?
| Janel is a stay-at-home mom of two and law school wife. Raised in a budget-conscious and do-it-yourself minded family, she loves seeing something in a store or magazine and making her own version at home for less money. Janel blogs about motherhood, crafts and recipes at Life with Lucie and Ella. | |