
The following post is from Janel of Life with Lucie and Ella.: Keep Cozy with a DIY Fleece Scarf with Pockets

I’m a California girl, born and raised, who now lives in a much different climate. Growing up, just about the only time we wore scarves was as a “costume” for our Winter Concert in elementary school. We just didn’t really need them. Now that I live in Virginia, I just love wearing scarves when the weather turns chilly.
Usually, if I need a scarf, I would like to wear a pair of gloves too. But honestly, I have such a hard time remembering to bring them with me. Of course, I also have to be able to find both gloves too, which can sometimes be a challenge.
Last December, I forgot my gloves in the car and had to suffer through the Christmas parade with ice-cold hands. Yeah, it took some fun away from the holiday festivities. However, if I’d had a scarf with pockets, my hands would have been nice and toasty. This scarf is great in the home when it is a little chilly and you don’t want to turn up the heat.
Since I don’t knit, I decided to sew a fleece scarf with pockets! Fleece fabric is usually about 58 inches wide, so I made the body of the scarf that wide and then sewed the pockets to the end to add extra length. I also wanted to add some more color, so I added another layer of coordinating fabric. Many fabrics aren’t 58 inches long, so you will either need to buy a little more than 1.5 yards and cut a strip from that or stitch pieces together to create a long enough piece.
How to Make a Fleece Scarf with Pockets
Supplies:
- fleece fabric – one 8″ x 58″ rectangle; two 8″ x 16″ rectangle for pockets
- coordinating fabric – one 8″ x 58″ inch rectangle (a continuous piece or several pieces stitched together to make this length)
- scissors
- thread
- sewing machine
- iron & ironing board
Directions:
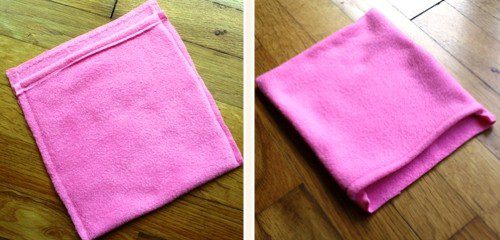
Prepare the pockets.
Fold down one short end of a pocket rectangle and stitch down. This will be the finished edge of your pocket opening. Fold the pocket rectangle almost in half with the wrong side out. Leave about 1-inch at the top as a single thickness. Pin sides together and then stitch down each side. (See below, left side.) Snip off threads. Turn right side out. (See below, right side.) There’s your pocket. Repeat with the other pocket rectangle.
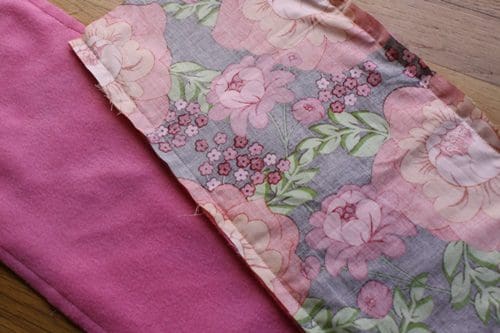
Prepare the body of the scarf.
Stack the long fleece rectangle and the coordinating fabric rectangle with the right sides facing each other. Pin along the edges. Stitch down the long sides to create a fabric tube. Snip threads, and turn right side out. Press the edges with an iron.
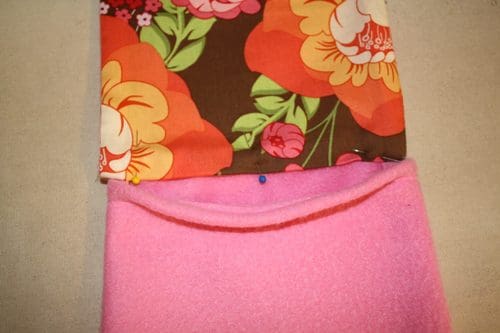
Attach the pockets.
Tuck the ends of the scarf body inside by about an inch. Press with the iron. Sandwich the single-thickness “tab” of the scarf pocket inside the end of the scarf tube and pin to secure. Stitch across to attach the pocket to the scarf. Snip off threads. Repeat with the other pocket.
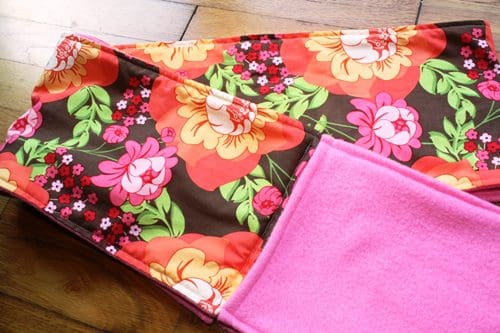
Finish the edges.
Topstitch all around the scarf to finish the edges. Position your needle close to the edge of the scarf and make a straight stitch all the way around the scarf. Pay attention to making sure that the edges of the pocket opening lay flat. Snip off the threads.
More ideas:
Knit Candy Cane Scarf
How do you keep cozy when it’s cold out?
| Janel is a stay-at-home mom of two and a law school wife. Raised in a budget-conscious and do-it-yourself-minded family, she loves seeing something in a store or magazine and making her own version at home for less money. Janel blogs about motherhood, crafts, and recipes at Life with Lucie and Ella. | |