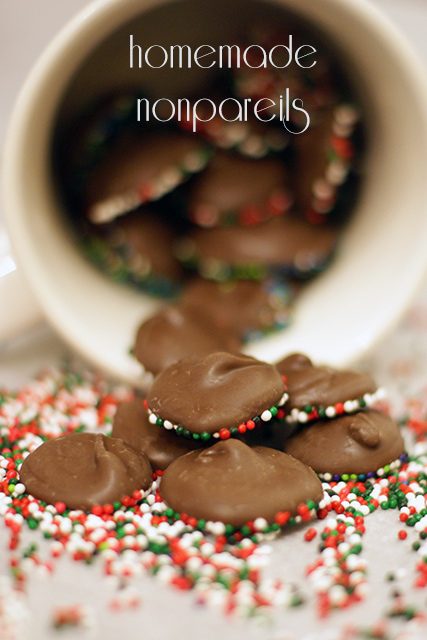
Okay, y’all. We’re exactly three days into this year’s series, and I hereby declare this my favorite project of the year: Homemade nonpareils !
My mom and I share a love of nonpareils, and when I realized last year that you could make them at home, I immediately added them to the list of projects for 2013. But for some reason I never got to them (I think I was afraid they wouldn’t work and all of my dreams would be crushed!).
This year, however, I was determined to try them, and they’re so much fun to make! Although they’re “upside down” compared to traditional nonpareils, I think they’re so cute.
You can use almond bark for these, but I would recommend a high quality chocolate instead since these are mostly chocolate.
Ingredients:
- 2-ounce container nonpareils
- 6 ounces milk, semi-sweet or dark chocolate
Directions:
Line a baking sheet (with sides) with parchment paper — I love these pre-cut sheets from King Arthur — and dump the container of nonpareils in the middle. Give the pan a few gentle shakes to evenly spread the nonpareils across the surface. You want them in a single layer close together, even if they don’t take up the whole pan.
Melt the chocolate on low in a saucepan or double boiler, stirring frequently. Be careful not to get any water in the chocolate, and watch it closely so it doesn’t burn.
Once it’s smooth, remove the pan from the heat and transfer the chocolate to a decorating bag that’s been fitted with a large round tip, like Wilton 1A. (Because the chocolate is runny, this is easiest if you have a second person to hold the bag with the tip folded up so that the chocolate doesn’t drain right out.)
Slowly drop circles of chocolate on top of the nonpareils. They will spread a little, so don’t put them too close together. Be careful not to press down with the tip because it will cause the chocolate to leak under the nonpareils.
Allow the chocolates to set, and then gently tilt the pan to the side to regroup the remaining nonpareils and repeat the process.
Let the chocolates sit for several hours until they’re completely hardened, and then transfer them to treat bags or a container. These can be stored at room temperature, but they’re so much tastier from the fridge!
Click here to add this recipe to your Plan to Eat account.
Variations:
Make separate batches in different varieties of chocolate and mix them all together once they’ve hardened.