The following post is from Amanda of Everyday Elements: One Camera Setting & One Big Impact on Your Pictures
An Embarrassing Confession
The second weekend in June, I went on a very special trip to Denver, Colorado, to a business retreat for mom-entrenuers put on by MomBiz Retreat. They had asked me to be the “event photographer.” I was so honored and definitely felt up to the challenge.
The gear was packed and toted halfway across the country. I took the camera, lenses, and flash with me to each session. The pictures looked great when I viewed them in-camera on the LCD screen, and I was very pleased with my efforts.
Returned home and uploaded them to my Lightroom 4, and sat there confused.
Were these MY pictures? They were much darker than I remembered them being when I looked through my LCD screen. What in the world could have happened?
Diagnosing the Problem
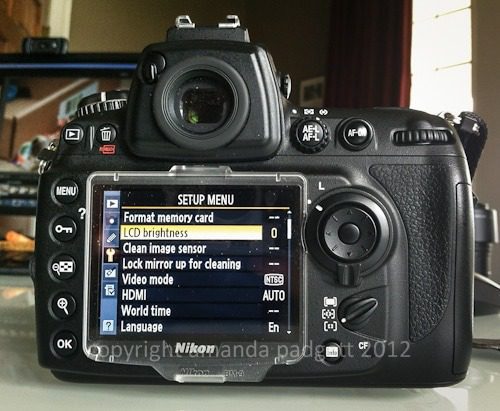
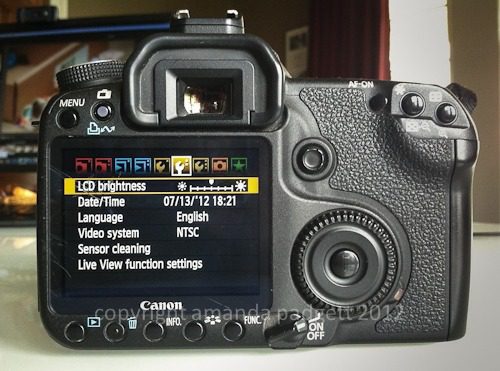
After much contemplation, I decided to check something in my menu…...the LCD screen brightness. What did I find? That it was up almost as high as it could go. I found the culprit.
You may be wondering, “didn’t she meter, like she instructs everyone else to do?” Normally I would have, but I was using flash for almost all the pictures, and so no metering took place. I started with my normal base settings for when I shoot with flash, then tweaked the flash intensity until I had the exposure I wanted – based on the LCD SCREEN.
So, when the screen showed me a nice, well-lit image, I thought everything was good to go. But, oh, how it wasn’t. I would say all of my images were underexposed by one to two stops.
An ounce of Prevention Worth a Pound of Cure
I was able to fix the exposure of the images via Lightroom, but it cost me additional time in editing that I would have rather been doing something else. And, if you read my tutorial on noise, you will learn that when you underexpose and then later fix in post-processing, you will have significant noise in the images. Sure enough, I had to tackle that when editing too.
The sad fact is that I remembered increasing the brightness about a week before because I had been outside and had difficulty seeing the screen. I did not take the time to set it back when I put the camera away that day. It was one of those “I’ll take care of later” things that I never remembered until AFTER it had wreaked havoc with other images.
Check your menu settings and make sure that your LCD screen brightness is set to produce the correct level of exposure. It may not always be at the middle/zero mark. You might need to increase or decrease depending on your tastes, shooting style, and your camera model (due to age, some screens may not be as bright as they once were).
Taking that a step further, I am writing down a series of small things to double-check each time before I put away my camera so that it’s ready for the next time I pull it out to use. After going through the checklist a few times, I am sure it will become a habit.
Do you have a pre-shoot checklist you go through to make sure problems like this don’t happen to you? If so, we’d love to hear it!
| Amanda is a quirky, introverted mom of four who is passionate about helping others learn their cameras and editing software. She homeschools her four kids, ages 13 to 6, all of whom run away when they see her carrying her camera. | |