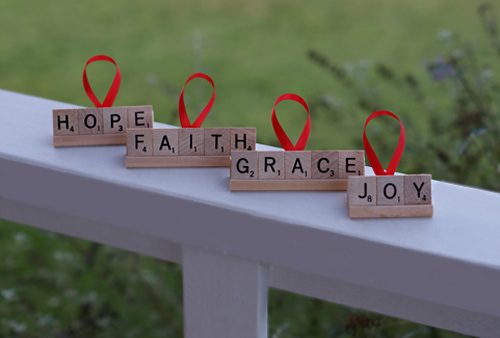
When I came across these DIY scrabble ornaments, I knew right away that I’d be making them this year!
You see, every year, we give our girls a special ornament to add to their collection. These are packed away in individual tins after Christmas so that they have their very own ornaments to put on the tree each year, and one day when they grow up and leave our home to make their own, they’ll have a nice starter set of ornaments to take with them.
I’ve been searching for ornaments with their middle names since our third daughter was born, and I will often find a set that includes 2 or 3 of them {Joy, Grace, Faith, and Hope}, but I’ve never been able to find a set of matching ornaments with all four. These scrabble ornaments are adorable, but I was finally able to make them a matching set with their middle names — yay!
I also made several for other people, but I’ve had someone discover their gift through a blog post before, so I’m not risking it this time!

Supplies:
- wooden Scrabble trays and tiles
**I purchased this Scrabble Me set and was able to make 8 ornaments - ribbon, cut into 5-6″ lengths
- pencil
- miter or hand saw
- drill with 3/32nd bit
- white glue
- paintbrush
Directions:
To start, decide on the words/names you’ll be making. Lay these out on your wooden trays, pairing the words to make the most of the trays. Line the letters up to the outside edges and mark the tray on the inside edge of each word with a pencil.
Remove the letters and cut the trays with a miter saw. Then, drill a hole in the top of each tray (my husband used a 3/32nd drill bit).
Use a paintbrush to smooth a thin layer of white glue on the inside of the tray and then firmly press the letters onto the tray, squeezing them together on the sides as well.
Once dry, add a tiny bit of glue to the hole on the back and use an open paperclip to help you push the ends of your ribbon in.
Let dry completely before hanging.
Join us as we celebrate 101 Days of Christmas with new DIY projects, gift ideas, traditions, and more every day from now through Christmas!